

I have been wanting to make my 2yr old son a kids activity table for quite some time. He has been more and more interested in hands on play like coloring, play doh, and the 'bean bucket.' So, I really wanted him to have a kid friendly table that was at a comfortable height for play.
After doing a little online research, I fell in LOVE with this Hudson Trestle Table from Pottery Barn, but wasn't willing to spend $200 on it.
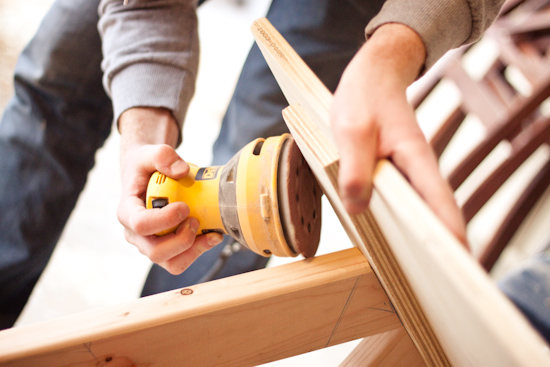
My husband and I made plans to make our own table and we set out to Home Depot to get the supplies. We ended up spending about $30 on wood supplies and paint (a much better price I must say :).


I did end up splurging a little on the chairs. I really wanted something fun and modern so I ordered THESE white stacking chairs from Target and paid $60 for both of them. I also purchased the blue storage buckets from Target (about $12 each). I don't believe they offer them online, but you can find them at Target near the children's home section (they are from the "Shaun White" line).
I was thrilled with how everything turned out, and most importantly my son loves it!
Here are a few more photos of the finished product...


Get the full tutorial and material list by clicking below!
Kids Activity Table
Materials Needed...
(1) 2x4 8'
(1) 1x2 8' (you only really need 2')
(1) 24" x 48" sheet of 3/4" thick plywood
(1) 12" x 29" sheet of 3/4" thick plywood (we used a scrap piece that we had)
2" Screws
1 1/4" Screws
Wood Glue
Paint
Tools Needed...
Skil Saw and/or Miter Saw (chop saw)
Power Drill
Speed Square (for angles, not needed if you use miter saw)
3/32" Drill Bit
Electric Sander
Paint Brush
Instructions...
1. First step is to cut all the pieces that you will need for the table:
- Cut a 23 degree angle on the end of the 2x4. From the long point measure back 21" and make a mark. This point will be the short side of your next 23 degree angle cut. So you will have a 2x4 piece that measures 21" from long to short (see below photo). This is your first table leg.This piece does not have to be perfect as long as the rest of the legs match. So ensure that they match I would recommend using the first leg as a stencil for the remaining 3.
- Cut the 24" x 48" sheet of plywood so that it measures 24" by 40". This will be the table top.
- Cut 4" off of the remaining 24" x 8" strip so that it is 20" x 8". Then cut it in half so that you have (2) 20" x 4" strips. these will be use to attach the legs to the table top.

- Also you will need to cut (2) 1' pieces of 1x2 and a piece of 12" x 29" plywood for the shelf (not shown in the photo above).
2. Before putting the table together you will need to makes some measurements and mark them on each piece of wood.

- Take the (4) legs and measure and draw a line in the center of the top ends as shown above. Make sure that these lines extend down the sides a little so that the center mark is visible when the plywood strip is put on top.


Now apply the glue to the top of leg mounting plywood strips. To make sure the shelf fits, place the shelf plywood in between the legs and adjust accordingly (as shown in the photo above).


Good luck! We had a ton of fun and hope you do too! Let me know if you have any questions along the way.
WOW!! Looks great. Pottery Barn is one of my all time favorite stores...but I hate how everything is so crazy expensive..duh make it yourself ;) Turned out perfect
ReplyDeleteStrawberry Chic: Pottery Barn Kids Table Diy >>>>> Download Now
Delete>>>>> Download Full
Strawberry Chic: Pottery Barn Kids Table Diy >>>>> Download LINK
>>>>> Download Now
Strawberry Chic: Pottery Barn Kids Table Diy >>>>> Download Full
>>>>> Download LINK EO
It looks EXACTLY the same!! What a great job!! And thanks for stopping by my blog. You are such an inspiration :)
ReplyDeleteThis table is AMAZING!! It looks just the same as the PB one! I have to say I like the chairs you picked out better :) I'm pinning this so that once Caleb learns more about woodworking he can make this for us!
ReplyDeleteI wouldn't say they look the same.... I honestly think your version looks sturdier and prettier. Overall, I think your project turned out better than the PB version. Thank you for the instructions!
ReplyDeleteThat looks awesome! Such a cute little table and I love the blue bins underneath :)
ReplyDeleteWOW Love it! You did a fantastic job, I love the color.
ReplyDeleteLove it! Love it! Love it!
ReplyDeleteTruthfully, I like your table way better than the Pottery Barn one! Especially the color. It turned out sooooo good!
ReplyDeleteI like your version better than the Pottery Barn on. It's so stinkin cute.
ReplyDeleteyou did a fantastic job.
ReplyDeleteWow, you are one crafty lady. Props to you for taking this on. Hey, I tagged you on my blog today =)
ReplyDelete- Sarah
http://agirlintransit.blogspot.com
Amazing! I like yours better than the Pottery Barn version :)
ReplyDeleteWOW! you did an amazing job! This is a great tutorial!
ReplyDeleteThis is so great! Perfect for the kiddos :) I just pinned this and an following you now too :) Would love for you to share with my readers if you get a chance: http://www.momontimeout.com/2012/02/taking-timeout-thursday-no18.html
ReplyDeleteYour version is incredible! I really wish I was more handy with power tools!
ReplyDeletethat is so perfect!!!! I so need to make this for my girls. We have a nice table from ikea but it's plastic and they're constantly pushing it around and flipping over the chairs!
ReplyDeleteI saw this on pinterest! Love it!
ReplyDeleteVery nice! Well done! Like the color.
ReplyDeleteLove it. I'm working on it right now only I scaled the table top down a little to fit the space that I'm working with. I wondered...I'll bet there's a way to take the same concept and make benches for either side. A hole through the middle of the table and an umberella and it would make a great kids picnic table too. I'll try to send you a pic of mine. So excited. Thanks
ReplyDeleteLove the colors!!! Can I ask where you got the blue baskets? Love them!
ReplyDeletewhen i first glanced through i thought yours was the pottery barn table. way to go!
ReplyDeleteBEAUTIFUL! love PB but urs is rockin! job well done.
ReplyDeleteThis looks FAB and even better- those adorable Target chairs are now on clearance!! I just snatched them up for $42 : )
ReplyDeleteThank you for sharing.
I absolutely love your table plus the little modern chairs you used are fab!
ReplyDeleteMaybe I just missed it in the post, but would you mind sharing the yellow paint color you used? Yellow can be so hard to get right & I love this shade!
ReplyDeleteLove the color! Do you know what the color is?
DeleteAbsolutely loved this project of yours! So much so that we built a table for our daughter, too! Just posted about today on my blog with links back to your fabulous tutorial. Thanks for sharing your project!!! http://www.thetallchickblog.com/2012/05/diy-kids-activity-table.html
ReplyDeleteYours looks awesome! I'm so glad my tutorial was useful.
DeleteYOURS IS MUCH BETTER THAN PBS. CHEERS!!!
ReplyDeleteWILL BE MAKING IT FOR OUR BABIES OF COURSE!
Beautiful! We are looking for a good activity table option as well. I now have this high on our list of options! What type of paint did you use? I recently painted my first piece of furniture (a bookshelf) and it came out well, but I had a lot of anxiety picking out paint since I had no idea how things would hold up. Thanks again!
ReplyDeleteWow! Yours looks much nicer. Putting on my to do list for when my baby is older
ReplyDeleteI adore this! Thanks for an awesome tutorial!!! :)
ReplyDeleteThis is so cute!! Good job!
ReplyDeleteI must have one for my son, too!! SERIOUSLY, can you make me one!? I love making my own stuff, but I don't have the tools that you said you needed. I love yours way more than the pottery barn one!! What a nice husband you have to help you,too!! thanks for sharing everything and not missing a step! Some tutorials aren't thorough enough!! great job!
ReplyDeleteps. what program do you use to write on your photographs, ie : " my version"?
ReplyDeleteSorry for the late response, but I use Photoshop.
DeleteOk, I know I'm reading this post months after you wrote it, but it's EXACTLY what I needed! I L-O-V-E your table; you guys did a great job! We're adopting our three year old niece soon and are planning her room. This table will be perfect!
ReplyDeleteI love this, and think yours came out even better than the pottery barn version! Thanks for the detailed instructions. I am planning for our new game room and think this will be perfect!
ReplyDeleteThank you so much for having these instructions posted! I just went to the PBK store yesterday to order the Hudson Trestle Table because it was on sale finally, but it was sold out! I really had my heart set on it, but now I can make it myself! Thank you thank you!
ReplyDeleteBeautiful table!! What are the finished dimensions?
ReplyDeleteI have been wanting to make my 2yr old son a kids activity table for quite ... tabletstoddlers.blogspot.com
ReplyDeleteThat looks great! I love building for my kids! >)
ReplyDeleteI love this table! We are planning on building this for our girls using your plans - thanks so much. Question - do 2 chairs fit on one side..? We'd like 4 to be able to fit when we have friends over.
ReplyDeletehow old do you have to be to work at spirit halloween
ReplyDeleteHalloween Jokes for Kids
How much does spirit halloween pay
Halloween Jokes
Borderlands 3 Halloween Event
Kings Dominion Halloween
Halloween Background Images
Busch Gardens Halloween
Halloween Wallpapers
Tales of Halloween
College Halloween Costumes
Celebrity Halloween Costumes
Sexy Halloween Costumes for Women
Men Halloween Costumes
When is Halloween This Year
Sexy Plus Size Halloween Costumes
Batman The Long Halloween
Halloween Costume Ideas for Women
Disneyland Halloween Party
Disneyland Halloween Food
Cheap Halloween Decorations
Pottery Barn Kids
Spirit Halloween Jobs
Halloween 2019 Date
Family of 3 Halloween Costume Ideas
Newborn Halloween Costumes
Overwatch Halloween 2019
powerpuff halloween costumes
funny halloween costumes
mens halloween costumes
halloween nail ideas
infant halloween costumes
Maternity Halloween Costumes
halloween food ideas
toddler girl halloween costumes
halloween party ideas
2019 halloween costume ideas
women halloween costumes
Halloween trick or treat
ReplyDeleteNice Post
Your Dream is here
microsof t365 crack
free vpn 2021 crack
adobe illustrator free trial download
auslogics disk defrag pro crack with key latest
photoshop free trial download
initial audio 808 studio crack for mac free download
roland cloud bundle for mac
tone empire goliath cracked vst plugins mac torrents
how make your ps4 faster database rebuild
ReplyDeleteInsightful article you have here. I did a write up myself on this subject some time ago, and I wish I had your brief article as a resource back then. Oh well. Thanks again for this report.
download initial-audio-studio
I have read your article really great and helpful. I recommend this website really interesting.
ReplyDeleteVery efficiently written information. It will be beneficial to anybody who utilizes it. MegaIncomStream
ReplyDeleteReally useful tips. It’s helps me to stay lean and healthy. Thanks for the tips. Waiting for next Article…..
ReplyDeleteHere I write an article on one cup of this will destroy your nail fungus and many articles on the topic of Lifestyle and 5e formulas. Kindly review it.
Also read it: a brief intro Thanks
ReplyDeletenice information...Good blog. If you want want know, more click here.
Filmy4wep
eResults
YouTube video download
YouTube video download y2mate
Google Translate Malay to English
nice information...Good blog. If you want want know, more click here.
ReplyDeleteCloud of Daggers 5e
Mangago
Mangaowl
How to Refresh Outlook
Montreal Canadian tickets
I am very impressed with your post because this post is very beneficial for me and provide a new knowledge…
ReplyDeleteTLex Suite Crack
SoftPerfect Network Scanner Crack
Creature Animation Pro Crack
Foxit Studio Photo Crack
Photo Pos Pro Premium Crack
nice information...Good blog. If you want want know, more click here.
ReplyDeleteuwatchfree
filmy4wep
jaa life login
firebolt 5e
cloud of daggers 5e
picashow
Vegamovi
Dr.Sugarbaker Baylor
Buccal Fat Removal
good work
ReplyDeleteWhat’s the difference between open guard vs closed guard?
What’s the difference between open guard vs closed guard?
What’s the difference between open guard vs closed guard?
What is Bonnie Short For?
What is Bonnie Short For?
ReplyDeleteI'm really impressed with your writing skills, as smart as the structure of your weblog.
Is this a paid topic or do you change it yourself?
However, stopping by with great quality writing, it's hard to see any good blog today
DRAWBOARD PDF Crack
TRANSMUTER STUDIO Crack
FREEMAKE VIDEO DOWNLOADER Crack
SHARP WORLD CLOCK Crack
nice information...Good blog. If you want want know, more click here.
ReplyDeleteuwatchfree
filmy4wep
jaa lifestyle login
lay on hands dnd 5e
good
ReplyDeletegood
good
good
hi
ReplyDeletehi
hi
hi
Strawberry Chic: Pottery Barn Kids Table Diy >>>>> Download Now
ReplyDelete>>>>> Download Full
Strawberry Chic: Pottery Barn Kids Table Diy >>>>> Download LINK
>>>>> Download Now
Strawberry Chic: Pottery Barn Kids Table Diy >>>>> Download Full
>>>>> Download LINK 4h
ReplyDeleteI like your all post. You have done really good work. Thank you for the information you provide, it helped me a lot. I hope to have many more entries or so from you.
Very interesting blog.
plugtorrent.com
360 Total Security Crack
for more information please read our blogs posts
ReplyDeletehttps://www.businessdope.com/robotic-process-automation-services-2/
https://www.businessdope.com/robotic-process-automation-services/
https://www.businessdope.com/pega-robot-process-automation/
https://www.businessdope.com/robotic-process-automation-services-rpa/
https://www.businessdope.com/competitor-pricing-analysis/
https://www.businessdope.com/elon-musk-internet/
Wow Great
ReplyDeleteWow Great
Wow Great
Wow Great
Wow Great
Wow Great
Wow Great
Wow Great
Wow, amazing block structure! How long
ReplyDeleteHave you written a blog before? Working on a blog seems easy.
The overview of your website is pretty good, not to mention what it does.
In the content!
UltraISO Premium Crack
Sonnox Oxford Reverb Crack
Sound theory Gullfoss Crack
Overloud TH-U Full Crack
Electronik Sound Lab Drumart Crack
VLC Media Player Crack
Sejda PDF Desktop Pro Crack
plugin alliance all bundle Crack
Adobe Prelude CC Crack
อยู่กับใครไม่มีค่ามาอยู่กับเราสิคะรับรองว่าคุณจะได้รับความประทับใจที่คุณเคยได้รับ เปิดประสบการณ์การเล่นเกมใหม่ใหม่พร้อมรับสัมผัสเกมใหม่ใหม่ตลอดเวลาที่อัพเดทตลอดทั้งเปลี่ยนให้คุณตื่นตาตื่นใจกับเกมใหม่ได้ตลอดเวลา สล็อตpgเว็บตรง
ReplyDeletehttps://onlineabedon.blogspot.com/
ReplyDeletewhat does teched mean
ReplyDeletebest gaming laptop
ReplyDeletehow to find hidden cameras using mobile phones
ReplyDeletesmart tech solutions
ReplyDeleteCool
ReplyDelete