


I use to have a little Etsy shop where I sold felt flower headbands and hair clips. I had so much fun making them but sadly decided to quit selling for multiple reasons... First off, I never had enough time to mass produce any of the headbands/hair clips so when I made a sale, it was always a race to try to get the headband made, packaged, and sent off asap. Also, I thought I priced everything fairly reasonably, but once Etsy and Paypal took their percentage of my profit I really wasn't making much (or at least not enough for the time and stress I had to put into each one).
But now, I love making the felt flowers for baby showers, birthday's, or Christmas gifts. I really love making them and turns out, it's a great inexpensive and thoughtful gift!
As promised, I have put together a tutorial for one of the flowers I make most often. Click below to get the full tutorial!
Peony Felt Flower
(adapted from the original peony flower by yoonie-at-home)
Materials Needed
Felt, color is up to you! (can purchase in small sheets for about .30 cents at most craft stores)
Needle & thread (you won't see it when the flower is complete so the color doesn't matter)
Hot glue gun (optional craft glue - if hot glue is too messy for you!)
Metal hair clip
Fabric pins
Fabric/craft scissors
Small faux pearl beads (can buy a strand at Walmart in the craft section for a couple of dollars)
Peony flower pattern (yoonie-at-home) has a great template that you can download HERE
Step 1. Download the peony pattern listed above, then cut out the 3 indicated pattern sizes.

Step 2. Pin each pattern to a small square of felt and cut out 3 of each shape (in whatever colors you want).


Step 3. Starting with the largest shapes, layer the flowers on top of each other and stagger the petals slightly.
Place the smallest flowers to the side.


Step 4. Take your needle and thread through the center of the flowers and tie off tightly so the petals flare out a little.


Step 5. Take the 3 smallest flowers and lay them so 1 petal on each flower is sticking up in the center.
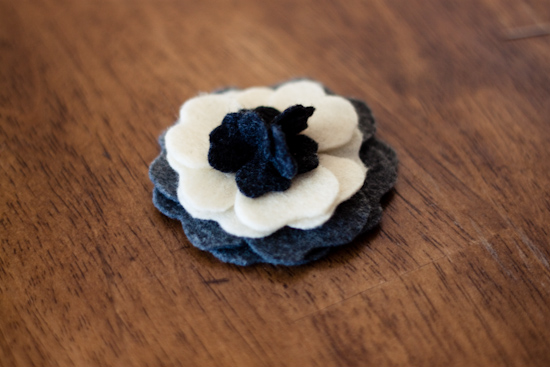
Step 6. Pick up the center clump of flowers (but keep their shape and placement in-tact)
Add a dab of hot glue to the center of the flat flowers then place the small flower clump back on top.


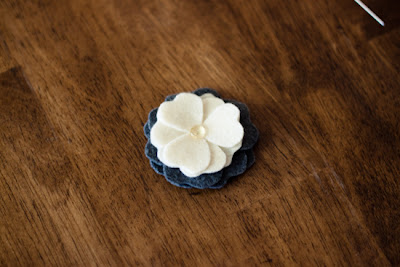
Step 7. Place a small dab of hot glue or craft glue in the center of each small flower. Then add the pearl beads over the top.


Step 8. Cut a circle of felt smaller then the diameter of the flower and adhere to the back of the flower. Glue your metal hair clip on top, and let dry if needed.

If you are making this for a baby clip, refer to THIS tutorial for the nylon headband.
super cute! I hear you on the fee's ...Etsy's isn't so bad...it is paypal that gets me :(
ReplyDeleteSo, so cute! These might even be easy enough for me to try!
ReplyDeleteFelt will always hold a special place in my heart. I love this tutorial. Thanks so much for sharing it =)
ReplyDelete- Sarah
http://agirlintransit.blogspot.com
I think tutorials are better then etsy any day:) Love this flower, so sweet!
ReplyDeleteJust think, now you can make them for your own little girl!!! Congrats on your happy news, so excited for you. Thanks for the great tutorial, I acutally think that I could make these, and I am not at all crafty!
ReplyDeleteSo cute! The clips you made for Allie are still our favorites.
ReplyDelete